Whip Up Show-Stopping Banoffee Pie in Minutes: A No-Bake Delight
Imagine a dessert that looks like it took hours of painstaking effort, yet comes together with astonishing ease and requires absolutely no baking. Meet the Easy No-Bake Banoffee Pie: Your New Go-To Dessert – a truly show-stopping British classic that promises pure indulgence with minimal fuss. If you’ve never experienced the magic of banoffee pie, prepare to fall head over heels for its irresistible layers of buttery biscuit crust, luscious caramel, fresh bananas, and clouds of whipped cream. It's rich, sweet, and every bite is pure bliss, making it the perfect dessert for impressing guests or simply treating yourself!
The beauty of this banana toffee pie lies in its simplicity and the masterful combination of textures and flavors. Originating in Britain, the name "banoffee" is a delightful portmanteau of "banana" and "toffee," perfectly encapsulating the star ingredients. Unlike complicated bakes, this no-bake wonder allows you to assemble a truly elegant dessert in mere minutes, letting your refrigerator do the heavy lifting of chilling and setting. Forget the stress of ovens and tricky techniques; with pantry-friendly ingredients and straightforward steps, you can create a dessert that tastes and looks incredibly fancy without any of the culinary gymnastics.
The Anatomy of a Perfect Banoffee Pie: Layers of Pure Bliss
What makes a banoffee pie so captivating? It's the harmonious interplay of its distinct layers, each contributing a vital element to the overall experience:
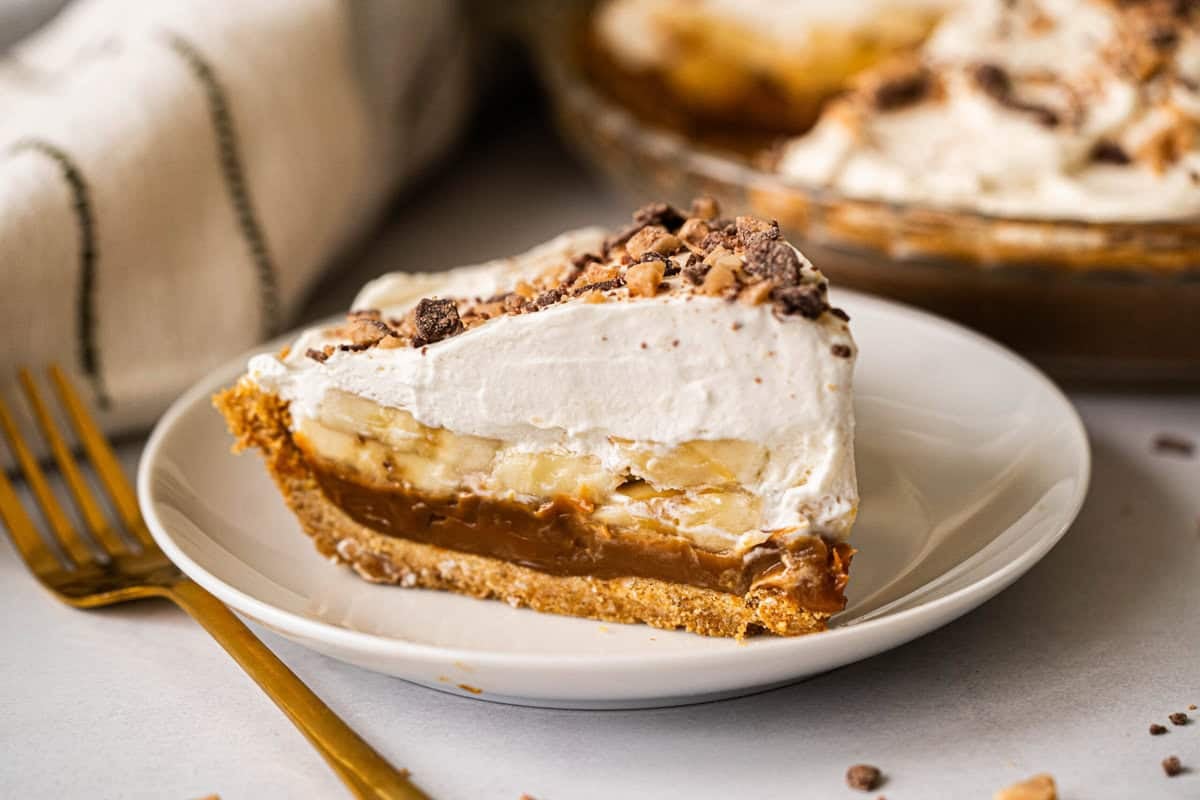
- The Buttery Crust: The foundation of any great pie, the banoffee crust typically uses crushed graham crackers (or digestive biscuits, for a more traditional British touch) mixed with melted butter. When pressed firmly into the pie plate and chilled, it creates a wonderfully crunchy, sweet, and structurally sound base that beautifully complements the softer layers above. The key here is compactness – a well-pressed crust won't crumble when sliced.
- Luscious Dulce de Leche (Toffee): This is arguably the heart and soul of the banoffee pie. Dulce de leche, which translates to "sweet of milk" in Spanish, is a thick, rich caramel sauce made by slowly heating sweetened condensed milk until it caramelizes into a deep, glossy bronze. Its creamy texture and intense caramel flavor provide the "toffee" element that defines this pie, creating a sticky, sweet counterpoint to the fresh fruit and cream.
- Fresh Banana Slices: What's a banoffee pie without the "bana"? Thick slices of ripe, but firm, bananas introduce a natural sweetness and a soft, yielding texture. They provide a refreshing contrast to the richness of the dulce de leche and whipped cream, ensuring each bite is balanced and not overly cloying.
- Pillowy Whipped Cream: The crowning glory of the pie, a generous mountain of freshly whipped cream adds an ethereal lightness and creaminess. For an elevated touch, a pinch of salt in the whipped cream is a game-changer. This lightly salted whipped cream ingeniously cuts through the sweetness of the crust and bananas, while also accentuating the deep caramel notes of the dulce de leche, lending a sophisticated salted caramel vibe to the entire dessert.
Mastering the Marvelous Dulce de Leche: Homemade vs. Store-Bought
The quality of your dulce de leche can truly make or break your banoffee pie. Luckily, you have excellent options, whether you're short on time or eager for a little culinary alchemy.
Homemade Dulce de Leche: The Magical Transformation
For those who appreciate the journey as much as the destination, making your own dulce de leche from sweetened condensed milk is a surprisingly simple and deeply rewarding process. While it requires a few hours, it's almost entirely hands-off: you simply simmer an unopened can of sweetened condensed milk in a pot of water on the stovetop for 2-3 hours. The results are truly magical – when you pop the can open, you’ll discover that the milk has thickened into a luxurious, glossy, deep bronze caramel with an unparalleled depth of flavor. This homemade version lasts up to two weeks when stored in an airtight container in the refrigerator, making it perfect for preparing ahead of time. For a deeper dive into crafting this essential component, explore Mastering Banoffee Pie: The British Classic with Homemade Dulce de Leche.
Store-Bought Dulce de Leche: The Time-Saving Secret
If time is of the essence, store-bought canned dulce de leche is a fantastic shortcut that cuts prep time considerably without sacrificing much quality. You’ll typically need about 1 ¼ cups from one 13.4-ounce can. However, a crucial tip: avoid using jarred or bottled dulce de leche. These often have a thinner consistency and a different flavor profile that won't deliver the same rich, gooey results as the canned variety. Stick to canned dulce de leche for that authentic, thick caramel layer.
Assembling Your No-Bake Masterpiece: Tips for Success
Putting together your banoffee pie is where the "minutes" in the title really shine. With your crust chilled and dulce de leche ready, the assembly is swift and satisfying.
- The Crust Foundation: After mixing your crushed graham crackers with melted butter, press the mixture firmly and evenly into your pie plate. A flat-bottomed dry measuring cup or a small bowl works wonders for compacting the base. Don't forget to use your fingers to press and neaten the edges, creating a professional finish. Chill the crust for at least 30 minutes to an hour before adding fillings to ensure it's firm. This crust can even be made up to a day ahead and kept covered at room temperature.
- Layering the Dulce de Leche: Generously spread your homemade or canned dulce de leche over the chilled crust. Aim for an even layer that covers the entire base. Its thick consistency will hold beautifully.
- Arranging the Bananas: Slice your fresh bananas into thick rounds. Arrange them artfully over the dulce de leche layer. Some prefer a single layer, while others stack them for a more substantial banana presence. Use bananas that are ripe but still firm to ensure they hold their shape and provide the best texture.
- The Whipped Cream Crown: Finally, top your pie with a generous cloud of freshly whipped cream. Remember that pinch of salt! Beat heavy cream with a touch of sugar and a tiny amount of salt until you reach soft to medium peaks. Spread it over the bananas, creating a luscious, inviting peak. You can even pipe it for an extra touch of elegance.
- The Final Chill: Once assembled, return your banoffee pie to the refrigerator for at least 2-3 hours, or ideally longer. This allows all the layers to set properly, making for clean slices and a truly cohesive dessert experience.
Beyond the Recipe: Tips for Presentation and Variations
While the classic banoffee pie is perfect as is, a few extra touches can elevate it even further:
- Garnishes Galore: Before serving, consider a light dusting of cocoa powder, a sprinkle of chocolate shavings, or even a drizzle of extra caramel sauce. A few curls of dark chocolate can add a sophisticated visual and flavor contrast.
- Biscuit Alternatives: While graham crackers are popular, try using crushed digestive biscuits, shortbread, or even Biscoff cookies for a different nuanced flavor profile in your crust. Each offers a unique texture and taste.
- Individual Servings: For an easy party treat, assemble banoffee pie in individual glasses or small ramekins. This makes for effortless serving and a charming presentation.
- Preventing Banana Browning: If you're making the pie well in advance, a light brush of lemon juice or orange juice on the banana slices can help prevent them from browning, though the whipped cream topping usually protects them adequately.
There's a reason banoffee pie has become such a beloved dessert around the world. Its combination of rich, sweet, and fresh flavors, coupled with a delightful mix of crunchy and creamy textures, is simply irresistible. Add to that the incredible ease of its no-bake preparation, and you have a clear winner for any occasion. Whether you’re an experienced baker or a kitchen novice, this pie is a guaranteed crowd-pleaser that looks and tastes like a gourmet creation without the gourmet effort. So, go ahead – whip up this show-stopping delight and prepare to watch it disappear!
